Using Calico instead of Open vSwitch
This guide describes how to deploy and run OpenStack environment with Calico ml2 Neutron plugin instead of OVS on top of Kubernetes cluster and how to integrate OpenStack and Kubernetes workloads.
Introduction
Calico’s pure L3 approach to data center networking integrates seamlessly with cloud orchestration systems (such as OpenStack) to enable secure IP communication between virtual machines, containers, or bare metal workloads.
By using Calico network plugin for both Kubernetes and OpenStack Containerized Control Plane (CCP) we can provide pure L3 fabric and cross-workload security for mixed workloads.
Deployment diagram:
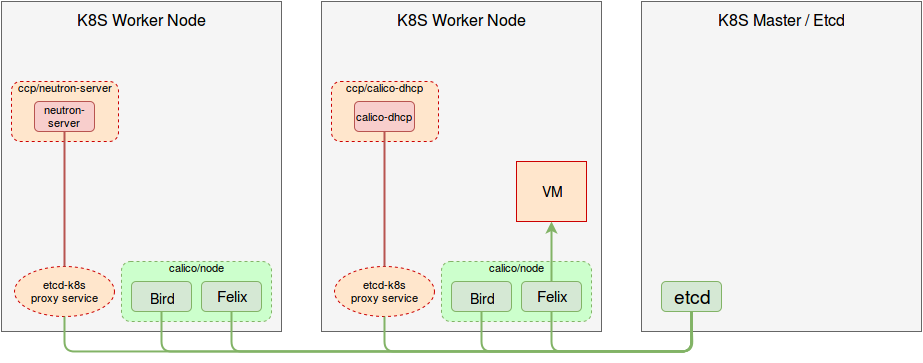
Deployment will look like this:
- Neutron is configured to use
networking-calicoML2 plugin. - Neutron DHCP agent is replaced with Calico DHCP agent.
- Open vSwitch pods are removed from the deployment topology.
- Additional Kubernetes proxy service is required to provide the connectivity from CCP pods to the main Etcd cluster (they cannot connect to etcd-proxy on a localhost since some containers are running in isolated network space, for example neutron-server).
- CCP Calico components are connected to the same Etcd DB as Calico services providing networking for Kubernetes.
- Calico/felix from
calico/nodecontainer has reporting enabled.
What is needed to deploy CCP with Calico network plugin:
- Runnning K8s environment with Calico network plugin (for a tested, recommended setup please check out this guide).
calico/nodeversion 0.23.0 or higher (you can uselatestimage tag).- CCP installed on a machine with access to
kube-apiserver(e.g. K8s master node). - CCP CLI config file with custom deployment topology.
Sample deployment
Sample deployment model
Following is an example of CCP deployment with Calico networking integrated with Kubernetes Calico components. Here is breakdown of services assignment to nodes (please note this isn’t yet CCP topology file):
node1:
  - controller
  - neutron-server
  - neutron-metadata-agent
node[2-3]:
  - compute
  - calico-dhcp-agent
Configuring requirements in Kubernetes cluster
Before deploying CCP we should run etcd proxy service (please don’t forget to replace IP addresses in this sample with your K8s cluster Etcd nodes’ IPs):
cat > /var/tmp/etcd-k8s-svc.yaml << EOF
kind: "Endpoints"
apiVersion: "v1"
metadata:
  name: "etcd-k8s"
subsets:
  - addresses:
    - ip: "10.210.1.11"
    - ip: "10.210.1.12"
    - ip: "10.210.1.13"
    ports:
      - port: 2379
        name: "etcd-k8s"
---
apiVersion: "v1"
kind: "Service"
metadata:
  name: "etcd-k8s"
spec:
  ports:
  - name: "etcd-k8s"
    port: 2379
    protocol: TCP
  sessionAffinity: None
  type: NodePort
status:
  loadBalancer: {}
EOF

kubectl --namespace=default create -f /var/tmp/etcd-k8s-svc.yaml
We also need to enable reporting in Felix:
etcdctl set /calico/v1/config/ReportingIntervalSecs 60
And add some custom export filters for BGP agent:
cat << EOF | etcdctl set /calico/bgp/v1/global/custom_filters/v4/tap_iface
  if ( ifname ~ "tap*" ) then {
    accept;
  }
EOF
Sample CCP configuration
Let’s write CCP CLI configuration file now, make sure you have the following
in your configuration file (let’s say it’s ccp.yaml):
kubernetes:
  namespace: "ccp"

configs:
  neutron:
    plugin_agent: "calico"
    calico:
      etcd_host: "etcd-k8s"
      etcd_port: "2379"

nodes:
  node1:
    roles:
      - controller
      - neutron-agents
  node[2-3]:
    roles:
      - compute
      - calico

roles:
  controller:
    - etcd
    - glance-api
    - glance-registry
    - heat-api-cfn
    - heat-api
    - heat-engine
    - horizon
    - keystone
    - mariadb
    - memcached
    - neutron-server
    - nova-api
    - nova-conductor
    - nova-consoleauth
    - nova-novncproxy
    - nova-scheduler
    - rabbitmq
  neutron-agents:
    - neutron-metadata-agent
  compute:
    - nova-compute
    - nova-libvirt
  calico:
    - calico-dhcp-agent
Now let’s build images and push them to registry if you have not done this already:
ccp deploy --config-file ccp.yaml build
We can now deploy CCP as usually:
ccp deploy --config-file ccp.yaml deploy
CCP will create namespace named ccp and corresponding jobs, pods and services
in it. To know when deployment is ready to be accessed kubectl get jobs
command can be used (all jobs should finish):
kubectl --namespace ccp get jobs
Creating networks and instances in OpenStack
After CCP deployment is complete we can create Neutron networks and run VMs.
Install openstack-client:
pip install python-openstackclient
openrc file for current deployment was created in the current working
directory. To use it run:
source openrc-ccp
Run test environment deploy script:
bash fuel-ccp/tools/deploy-test-vms.sh -a create -c -n NUMBER_OF_VMS
This script will create flavor, upload cirrios image to glance, create network and subnet and launch bunch of cirrios based VMs.
Uninstalling and undoing customizations
To destroy deployment environment ccp cleanup command can be used:
ccp --config-file ccp.yaml ccp cleanup
The following commands can be used to undo related customizations in Calico:
etcdctl rm /calico/bgp/v1/global/custom_filters/v4/tap_iface
etcdctl set /calico/v1/config/ReportingIntervalSecs 0
etcdctl ls /calico/felix/v1/host -r | grep status | xargs -n1 etcdctl rm
Remove Etcd proxy service:
kubectl --namespace=default delete -f /var/tmp/etcd-k8s-svc.yaml